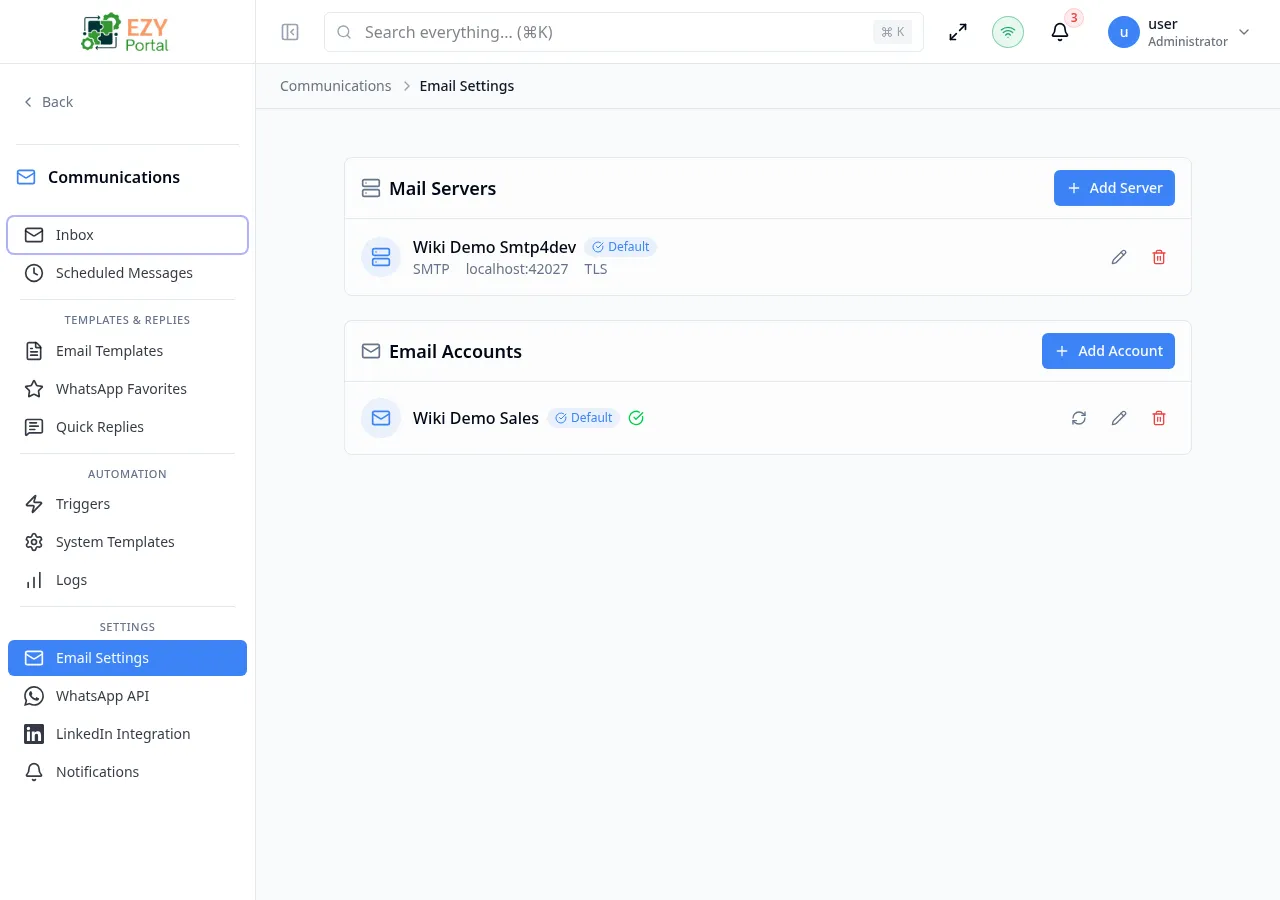
Email Settings
The Email Settings page is the central configuration workspace for your tenant’s email infrastructure. It has two sections: Mail Servers for outbound SMTP configuration, and Email Accounts for inbound IMAP accounts linked to those servers. At least one mail server must be configured before you can create an email account.
Accessing the Page
Section titled “Accessing the Page”- Route:
/communications/settings/email - Menu Path: Communications → Settings → Email
- Primary audience: Tenant administrators.
What you can do here
Section titled “What you can do here”- Add, edit, and delete SMTP mail servers for outbound email delivery.
- Test SMTP connectivity directly from the add or edit dialog.
- Add, edit, and delete email accounts that combine an IMAP inbox with an outbound mail server.
- Trigger a manual IMAP sync on any configured account.
- Mark one account as the default for outbound sends.
Common tasks
Section titled “Common tasks”- Open Communications → Settings → Email.
- In the Mail Servers section, click Add Server and configure your SMTP credentials.
- Click Test Connection to verify the SMTP settings before saving.
- After saving the server, click Add Account in the Email Accounts section.
- Select the mail server you just created, enter the email address and IMAP settings, and save.
- Mark the account as Default if it should be used by automation triggers that have no account specified.
- A mail server must exist before an email account can be created. If no servers are configured, the Add Account button shows a warning.
- Only one account and one server can be marked as default at a time. Marking a new entry as default automatically clears the previous default.
- SMTP passwords are stored encrypted. When editing, leave the password field blank to keep the existing password.
- The Test Connection button verifies that the portal can reach the SMTP host and authenticate with the provided credentials. It does not send a live email.
Mail Servers
Section titled “Mail Servers”Creating a Mail Server
Section titled “Creating a Mail Server”Click Add Server in the Mail Servers section header to open the Add Mail Server dialog.
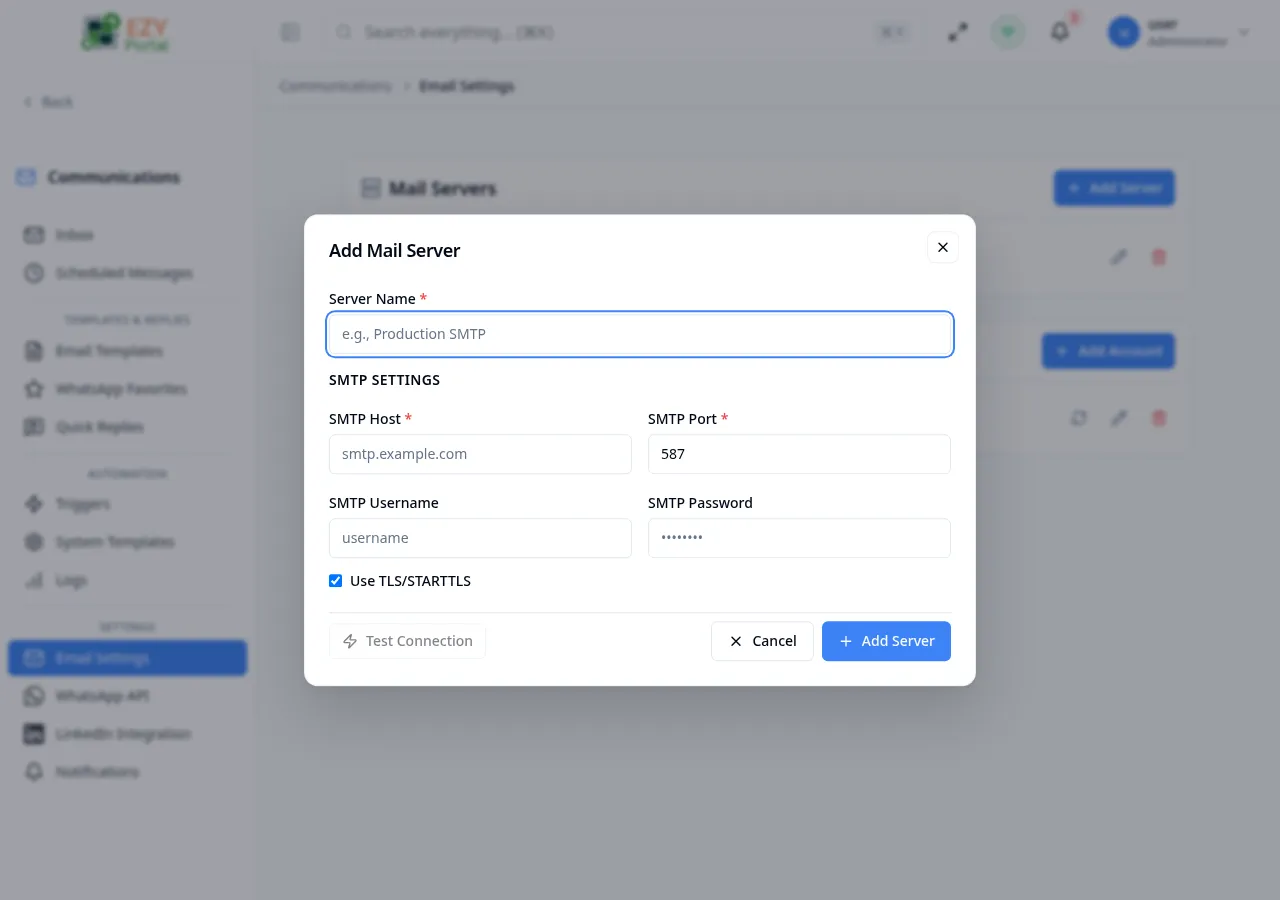
Fields
Section titled “Fields”| Field | Required | Type | Description | Default | Validation |
|---|---|---|---|---|---|
| Server Name | Yes | Text | Friendly label for this server (for example, “Production SMTP”) | — | Required |
| SMTP Host | Yes | Text | Hostname or IP of the SMTP server (for example, smtp.example.com) | — | Required |
| SMTP Port | Yes | Number | Port number for SMTP connections | 587 | Required; common values: 25, 465, 587 |
| SMTP Username | No | Text | Authentication username | — | — |
| SMTP Password | No | Password | Authentication password (stored encrypted) | — | — |
| Use TLS/STARTTLS | No | Toggle | Enables TLS encryption for the SMTP connection | On | — |
Steps:
- Click Add Server.
- Enter a Server Name and the SMTP Host.
- Set the SMTP Port (587 for TLS, 465 for SSL, 25 for plain).
- Enter SMTP Username and SMTP Password if authentication is required.
- Toggle Use TLS/STARTTLS as appropriate.
- Optionally click Test Connection to verify the settings.
- Click Add Server to save.
Editing a Mail Server
Section titled “Editing a Mail Server”Click the pencil icon on a server card to open the Edit Mail Server dialog.
Screenshot pending: Edit Mail Server dialog pre-filled with existing server settings
Same fields as the Add dialog. Leave the SMTP Password field blank to keep the existing password. Click Save Changes to apply.
Deleting a Mail Server
Section titled “Deleting a Mail Server”Click the trash icon on a server card.
- A confirmation dialog asks: “Are you sure you want to delete [name]? This cannot be undone.”
- Click Delete to confirm.
Note: Deleting a mail server that has linked email accounts will also remove those accounts’ outbound capability.
Email Accounts
Section titled “Email Accounts”Creating an Email Account
Section titled “Creating an Email Account”Click Add Account in the Email Accounts section header to open the Add Email Account dialog. A mail server must already exist.

Fields
Section titled “Fields”| Field | Required | Type | Description | Default | Validation |
|---|---|---|---|---|---|
| Email Address | Yes | The email address for this account | — | Must be a valid email | |
| Display Name | Yes | Text | Friendly label shown in the portal (for example, “Support Inbox”) | — | Required |
| Mail Server | Yes | Select | Outbound SMTP server to use | — | Required; must have at least one server configured |
| Set as default account | No | Toggle | Makes this the default sending account for automation triggers | Off | — |
| IMAP Host | No | Text | Hostname for incoming email (IMAP) | — | — |
| IMAP Port | No | Number | Port for IMAP connection | 993 | Common values: 993 (SSL), 143 (TLS) |
| IMAP Username | No | Text | IMAP authentication username | — | — |
| IMAP Password | No | Password | IMAP authentication password | — | — |
| Use TLS/SSL | No | Toggle | Enables TLS for the IMAP connection | On | — |
Steps:
- Click Add Account.
- Enter the Email Address and a Display Name.
- Select the Mail Server to use for outbound sends.
- Optionally configure IMAP settings to enable incoming email sync.
- Check Set as default account if this should be the tenant default.
- Click Add Account to save.
Editing an Email Account
Section titled “Editing an Email Account”Click the pencil icon on an account card.
Screenshot pending: Edit Email Account dialog pre-filled with existing account settings
The Email Address field is read-only after creation. All other fields, including the mail server assignment, IMAP credentials, and default flag, are editable. Leave password fields blank to keep existing passwords. Click Save Changes to apply.
Syncing an Email Account
Section titled “Syncing an Email Account”Click the refresh (sync) icon on an account card to trigger a manual IMAP sync. The icon spins while the sync is in progress. Use this to pull in new messages immediately without waiting for the scheduled background sync.
Deleting an Email Account
Section titled “Deleting an Email Account”Click the trash icon on an account card.
- A confirmation dialog asks: “Are you sure you want to delete the account [name]? This cannot be undone.”
- Click Delete to confirm.
Related Pages
Section titled “Related Pages”- Automation — assign email accounts to automation triggers for specific sender addresses
- Email Logs — view outbound email delivery history
- WhatsApp Settings — configure WhatsApp Business accounts