Form Schemas
The Form Schemas page is where HR administrators define the custom forms used throughout HR workflows. A form schema is a structured collection of fields that can be attached to a job posting (as the application form) or to an onboarding template (as the onboarding form). Schemas can be built using a visual drag-and-drop field builder, selected from pre-built templates, or defined directly in JSON. Each schema type can have one default schema that is auto-applied when no schema is explicitly selected.
Accessing the Page
Section titled “Accessing the Page”- Route:
/form-schemas - Menu Path: HR → Form Schemas
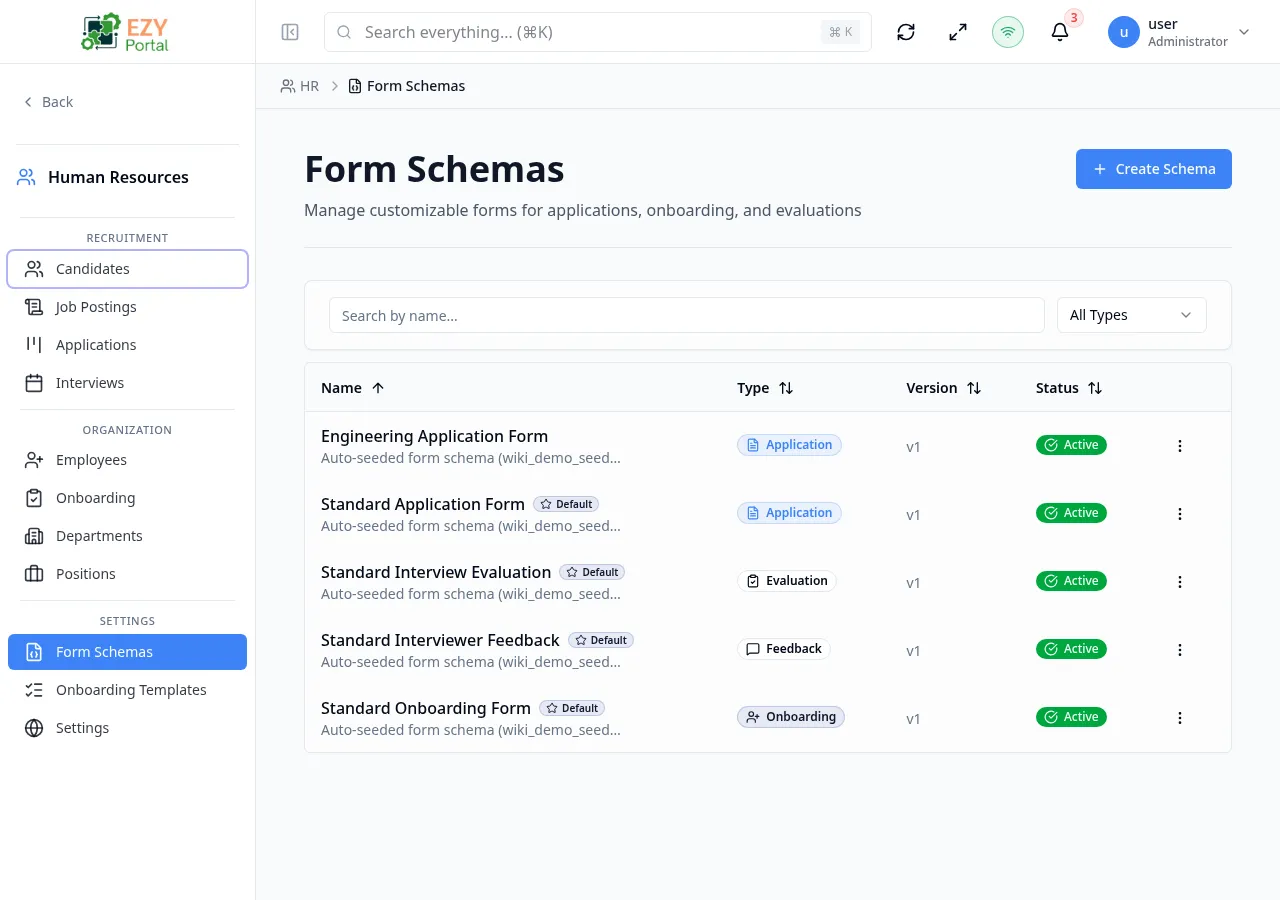
List Columns
Section titled “List Columns”| Column | Default Visible | Sortable | Description |
|---|---|---|---|
| Name | Yes | Yes | Schema name |
| Type | Yes | Yes | Workflow type the schema is used for |
| Version | Yes | Yes | Schema version number |
| Status | Yes | No | Default badge if this is the default for its type |
| Created | Yes | Yes | Creation date |
Schema Types
Section titled “Schema Types”| Type | Description |
|---|---|
| Application | Used as the application form on a job posting |
| Onboarding | Used as the onboarding form in an onboarding template |
| Evaluation | Used for candidate or employee evaluations |
| Feedback | Used for employee feedback collection |
| Other | General purpose forms |
Filtering
Section titled “Filtering”| Filter | Type | Description |
|---|---|---|
| Search | Free text | Searches by schema name |
| Type | Select | Filter by schema type |
Sorting
Section titled “Sorting”Click any sortable column header to sort ascending; click again for descending; third click removes the sort.
Pagination
Section titled “Pagination”Server-side pagination with configurable page size.
Actions
Section titled “Actions”Page Actions
Section titled “Page Actions”| Action | Description |
|---|---|
| Create Schema | Opens the Create Form Schema dialog |
Row Actions
Section titled “Row Actions”| Action | Description |
|---|---|
| Edit | Opens the schema editor dialog |
| Clone | Creates a copy of the schema as a new draft |
| Set as Default | Marks this schema as the default for its type |
| Delete | Opens the Delete confirmation dialog |
Creating a Form Schema
Section titled “Creating a Form Schema”Click Create Schema to open the Create Form Schema dialog.
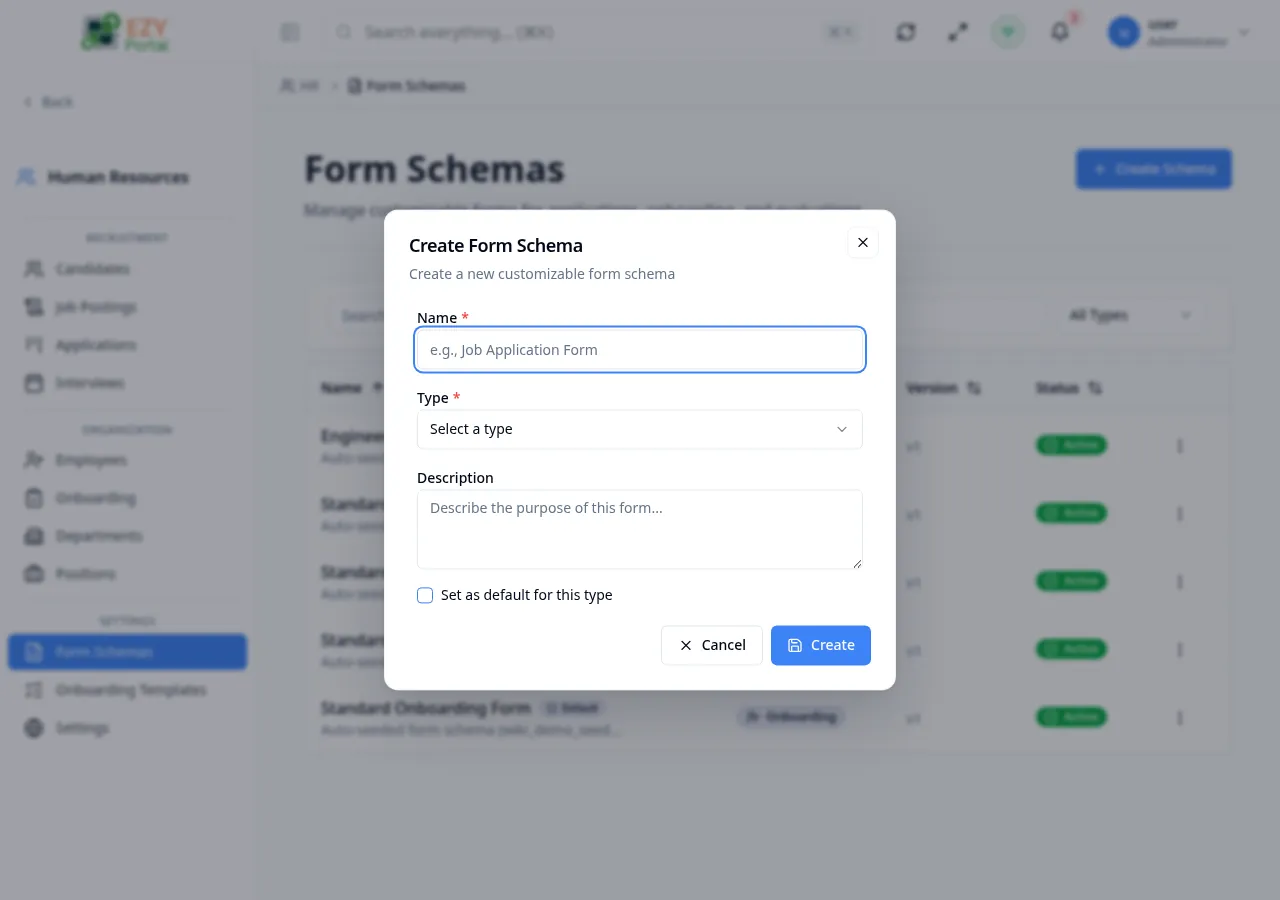
Basic Fields
Section titled “Basic Fields”| Field | Required | Type | Description | Default | Validation |
|---|---|---|---|---|---|
| Name | Yes | Text | Display name for the schema | — | Max 255 chars; uniqueness validated in real time |
| Type | Yes | Select | Application, Onboarding, Evaluation, Feedback, or Other | — | Required |
| Description | No | Textarea | Purpose of this schema | — | Max 2000 chars |
| Set as default | No | Toggle | Auto-applies this schema when no schema is explicitly selected | Off | — |
Steps:
- Click Create Schema.
- Enter a name and select the type.
- Optionally add a description and set as default.
- Click Create — the schema is created and the editor dialog opens automatically.
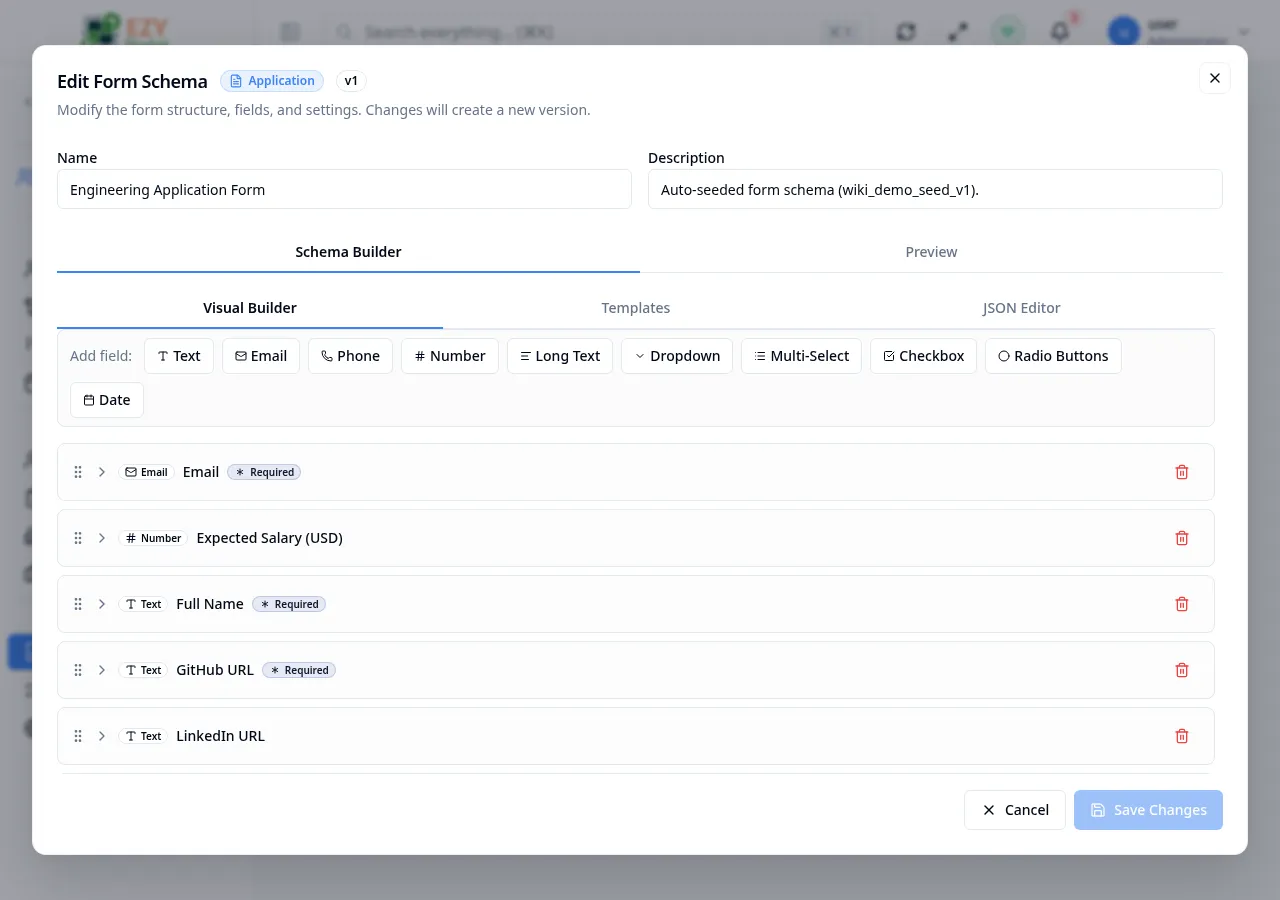
Editing a Form Schema
Section titled “Editing a Form Schema”Click the Edit row action to open the schema editor dialog. The editor has three tabs:
Visual Builder tab
Section titled “Visual Builder tab”A drag-and-drop field builder. Available field types:
| Field Type | Description |
|---|---|
| Text | Single-line text input |
| Email address input with format validation | |
| Phone | Phone number input |
| Number | Numeric input |
| Long Text | Multi-line textarea |
| Dropdown | Single-select dropdown |
| Multi-Select | Multiple selection dropdown |
| Checkbox | Boolean checkbox |
| Radio Buttons | Single choice from multiple options |
| Date | Date picker |
Click any field type in the palette to add it to the form. Each field has a Required toggle. Fields can be deleted individually.
Templates tab
Section titled “Templates tab”Pre-built template options organized by type. Selecting a template replaces the current field list with the template’s fields:
Application templates:
- Basic Application — name, email, phone, position, cover letter
- Detailed Application — experience, education, skills, availability
Onboarding templates:
- Personal Information — personal details, address, emergency contacts
- IT & Equipment Setup — OS preference, software needs, VPN access
Evaluation templates:
- Performance Review — ratings, strengths, goals
- 360-Degree Review — multi-rater feedback
Feedback templates:
- General Feedback — workplace, management, culture, benefits
- Exit Interview — departure reasons and improvement suggestions
JSON Editor tab
Section titled “JSON Editor tab”Provides direct access to the raw JSON schema definition. Advanced users can paste or edit the schema JSON directly. Changes are validated before saving.

Cloning a Schema
Section titled “Cloning a Schema”Click the Clone row action to create a copy of the schema. A dialog prompts for the new schema’s name (defaults to the original name with “(Copy)” appended). The cloned schema is saved as a separate record and can be edited independently.
Setting a Default Schema
Section titled “Setting a Default Schema”Click Set as Default on any schema. The default schema for a given type is automatically applied when no schema is explicitly selected — for example, when a job posting is created without an attached application form.
Only one schema per type can be the default at a time. Setting a new default automatically clears the previous one.
Deleting a Schema
Section titled “Deleting a Schema”- Open row actions and select Delete.
- Confirm in the dialog — the action cannot be undone.
Note: Deleting a schema that is set as the default for its type also removes the default designation. Job postings and onboarding templates that referenced this schema will no longer have an attached form.
Validation Rules
Section titled “Validation Rules”| Rule | Behavior |
|---|---|
| Name required | Cannot create without a name |
| Name uniqueness | Validated in real time with a green/red indicator |
| Name max length | Max 255 characters |
| Type required | Cannot create without selecting a type |
| Description max length | Max 2000 characters |
Common tasks
Section titled “Common tasks”- Open HR → Form Schemas from the sidebar.
- Click Create Schema, name it, and select the type (e.g., Application).
- In the editor, use the Visual Builder to add fields.
- Save and set as default if it should apply automatically to new postings.
- Attach the schema to a job posting via the Application Form field on the job posting.
Related Pages
Section titled “Related Pages”- Job Postings — Attach application form schemas to postings
- Onboarding Templates — Attach onboarding form schemas to templates