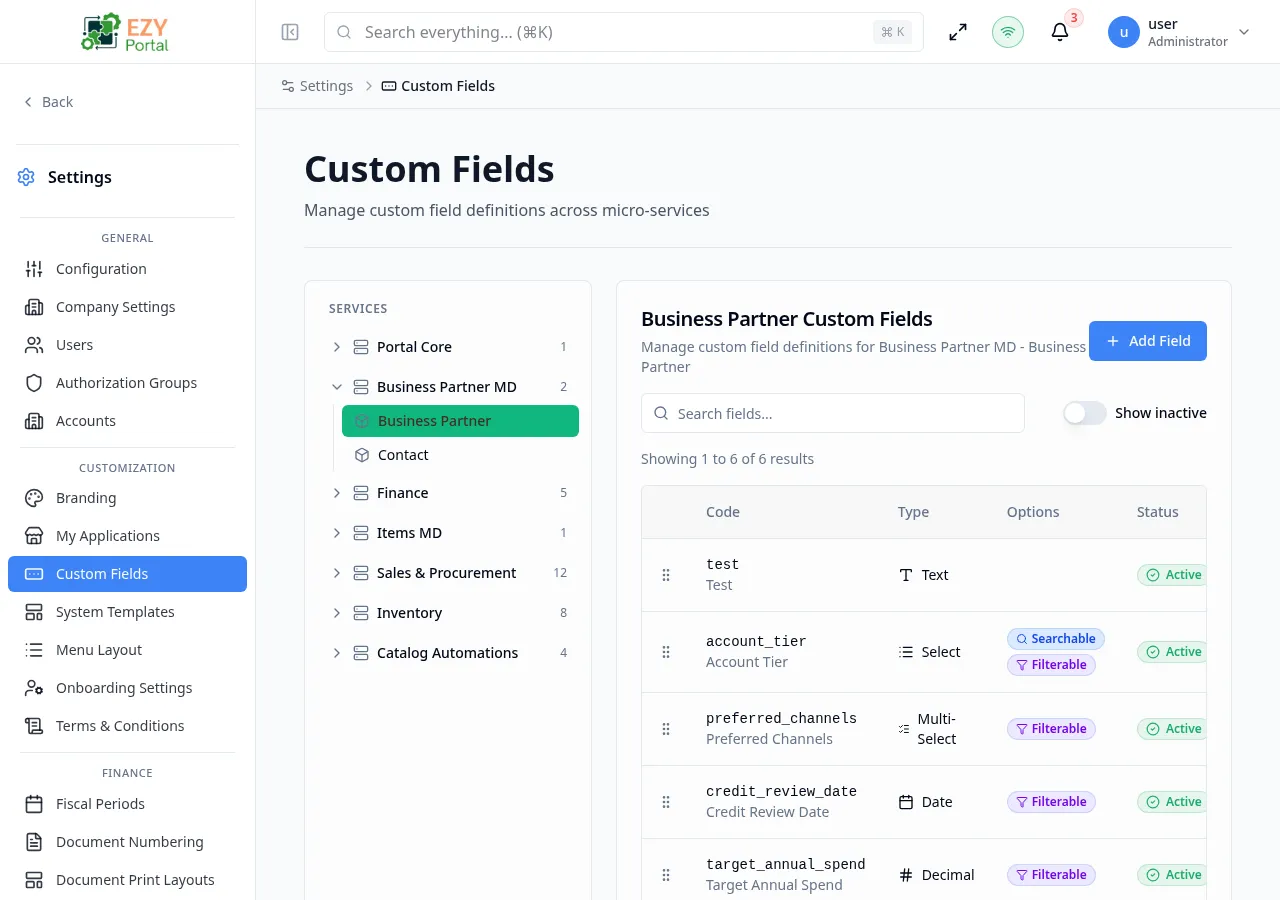
Custom Fields
Custom Fields extends standard portal entities with additional data points that your organization needs. The page uses a two-panel layout: an entity tree on the left and the selected entity’s field definitions on the right.
Accessing the Page
Section titled “Accessing the Page”- Route:
/custom-fields - Menu Path: Settings → Customization → Custom Fields
- Primary audience: Tenant administrators and other users with the required admin role.
What you can do here
Section titled “What you can do here”- Browse registered entities grouped by service in the left-side entity tree.
- Select an entity to view its field definitions in the right panel.
- Add new custom field definitions using Add Field in the right panel.
- Edit existing field definitions to update labels, validation rules, or display settings.
- Reorder fields by dragging rows in the definitions table.
- Delete field definitions that are no longer needed.
- Toggle inactive fields visible using the Show Inactive option.
Common tasks
Section titled “Common tasks”- Open Settings → Customization → Custom Fields.
- Locate the target entity in the left panel by browsing the service tree or using the search box.
- Click the entity name to load its field definitions in the right panel.
- Click Add Field to open the field definition form.
- Configure the field code, type, label, validation, and display settings across the four tabs.
- Click Save — the field appears in the definitions table and becomes available on the target entity form.
- Only entities that have registered custom-field support appear in the tree. If an expected entity is missing, confirm that its module is configured to support custom fields.
- The field Code is a permanent identifier and cannot be changed after creation. Choose it carefully.
- Deleting a field definition removes the template metadata. Existing data values stored against that code may be preserved in the backend but will no longer render in forms.
- Multi-select fields require at least 2 options. Select fields require at least 1 option.
Creating a Custom Field
Section titled “Creating a Custom Field”Click Add Field in the right panel after selecting an entity. A tabbed dialog opens with four sections: General, Validation, Display, and Options (Options tab appears only for Select and Multi-select types).
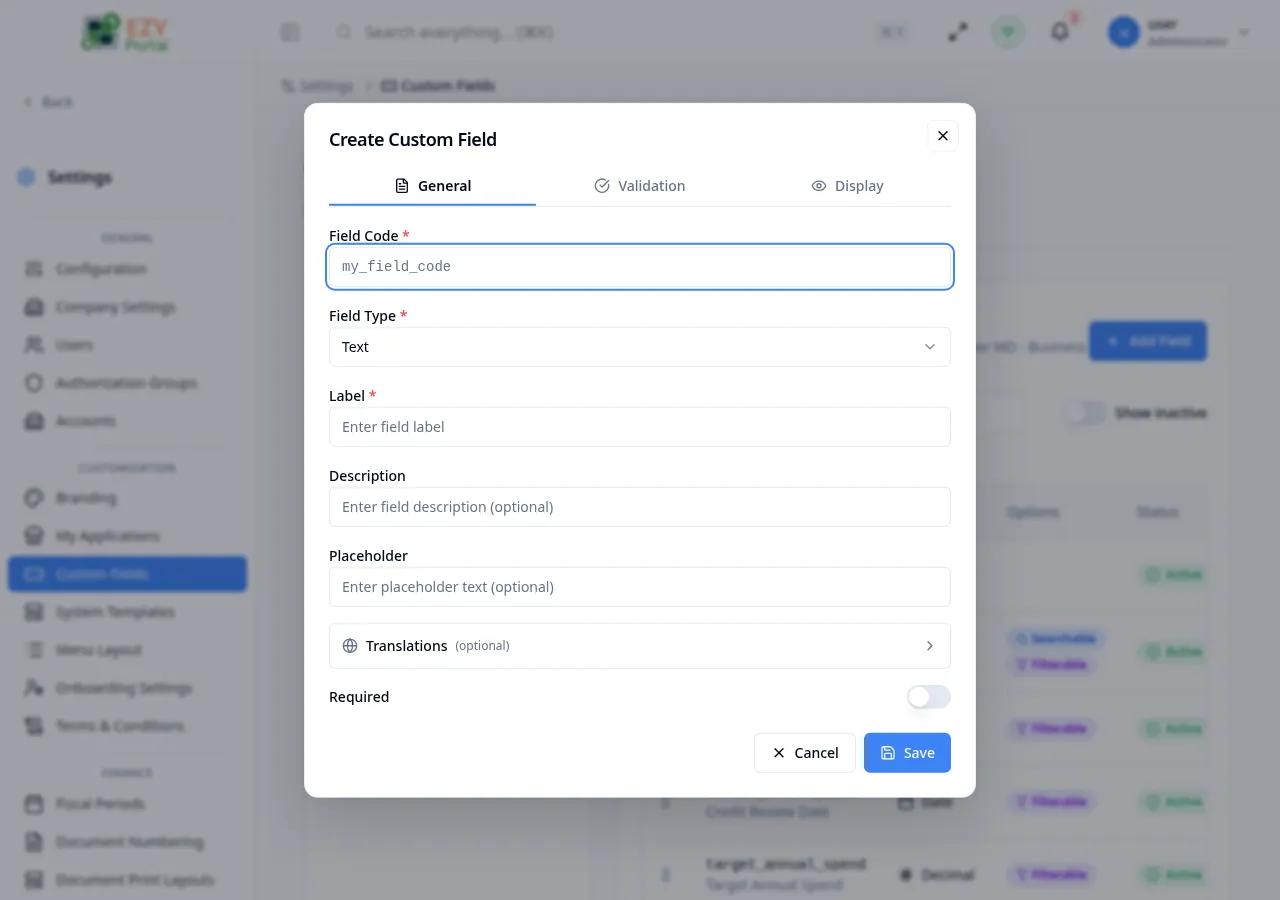
Fields — General tab
Section titled “Fields — General tab”| Field | Required | Type | Description | Default | Validation |
|---|---|---|---|---|---|
| Field Code | Yes | Text | Unique machine identifier for the field. Must start with a lowercase letter; only letters, numbers, and underscores allowed | — | Required; 2–50 chars; pattern ^[a-z][a-zA-Z0-9_]*$; read-only after creation |
| Field Type | Yes | Select | Data type: Text, Textarea, Number, Decimal, Date, Date & Time, Boolean, Select, Multi-select, Email, URL, Phone | — | Required; read-only after creation |
| Label | Yes | Text | Display label shown to users in forms (for the primary language) | — | Required |
| Description | No | Text | Optional hint shown below the field in forms | — | — |
| Placeholder | No | Text | Input placeholder text shown inside the field before the user types | — | — |
| Required | — | Toggle | Makes the field mandatory when the entity form is submitted | Off | — |
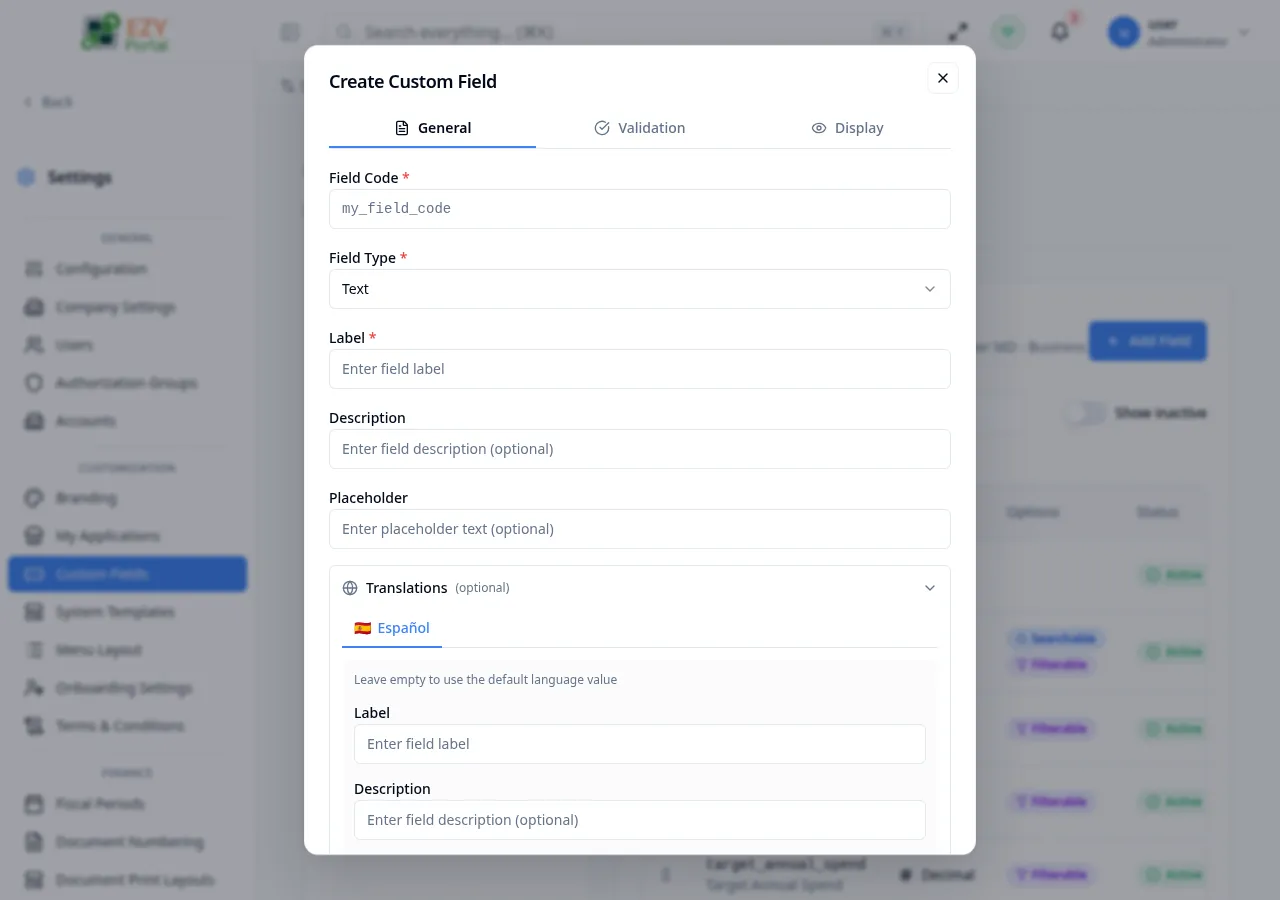
Translations (optional)
Section titled “Translations (optional)”When the tenant has multi-language enabled, an expandable Translations section appears between the placeholder and the Required toggle. It lets you provide translated copies of the Label, Description, and Placeholder for every other supported language. Leave any field empty to fall back to the primary-language value.
| Field | Required | Type | Description |
|---|---|---|---|
| Language tab | Yes (to translate) | Tab | One tab per supported language (other than the primary). A green dot indicates the translation is complete. |
| Label | No | Text | Translated label for the selected language. Empty falls back to the primary label. |
| Description | No | Text | Translated description hint. |
| Placeholder | No | Text | Translated placeholder text. |
Fields — Validation tab
Section titled “Fields — Validation tab”
| Field | Required | Type | Description | Default | Validation |
|---|---|---|---|---|---|
| Min Length | No | Number | Minimum character count (Text, Textarea types only) | — | — |
| Max Length | No | Number | Maximum character count (Text, Textarea types only) | — | — |
| Min Value | No | Number | Minimum numeric value (Number, Decimal types only) | — | — |
| Max Value | No | Number | Maximum numeric value (Number, Decimal types only) | — | — |
| Validation Pattern | No | Text | Regular expression for custom format validation (Text types) | — | Must be a valid regex |
| Required Error Message | No | Text | Custom message shown when a required field is empty | — | — |
| Min/Max Length Messages | No | Text | Custom messages for length violations | — | — |
| Min/Max Value Messages | No | Text | Custom messages for value range violations | — | — |
| Pattern Error Message | No | Text | Custom message shown when input does not match the pattern | — | — |
Translated Validation Messages (optional)
Section titled “Translated Validation Messages (optional)”When multi-language is enabled, the Validation tab also includes an expandable Translated Validation Messages section. It mirrors the custom error message inputs above, providing a tab per non-primary language so you can override each error message per locale. Empty fields fall back to the primary-language values.
Fields — Display tab
Section titled “Fields — Display tab”| Field | Required | Type | Description | Default | Validation |
|---|---|---|---|---|---|
| Visible | — | Toggle | Shows the field in forms and views | On | — |
| Searchable | — | Toggle | Includes the field value in search queries for the entity | Off | — |
| Filterable | — | Toggle | Allows filtering the entity list by this field | Off | — |
| Read-only | — | Toggle | Makes the field display-only; users cannot edit the value | Off | — |
| Active | — | Toggle | Enables or disables the field without deleting it | On | — |
Fields — Options tab (Select and Multi-select types only)
Section titled “Fields — Options tab (Select and Multi-select types only)”| Field | Required | Type | Description | Default | Validation |
|---|---|---|---|---|---|
| Option Value | Yes | Text | Internal stored value for the option | — | Required per option |
| Option Label | Yes | Text | Display text shown to users for this option | — | Required per option |
| Default Value | No | Select | Pre-selected option when the form opens | None | Must be an existing option value |
Steps:
- Select the target entity from the left panel.
- Click Add Field in the right panel.
- On the General tab, enter a Field Code and select the Field Type.
- Enter the Label for the primary language. Optionally add a Description and Placeholder.
- Toggle Required on if the field must be filled before saving the entity form.
- Switch to the Validation tab and configure any length, value, or pattern rules needed.
- Switch to the Display tab and configure visibility, searchability, filterability, and read-only behavior.
- If the field type is Select or Multi-select, switch to the Options tab and add at least one option (two for Multi-select).
- Click Save. The field appears in the definitions table.
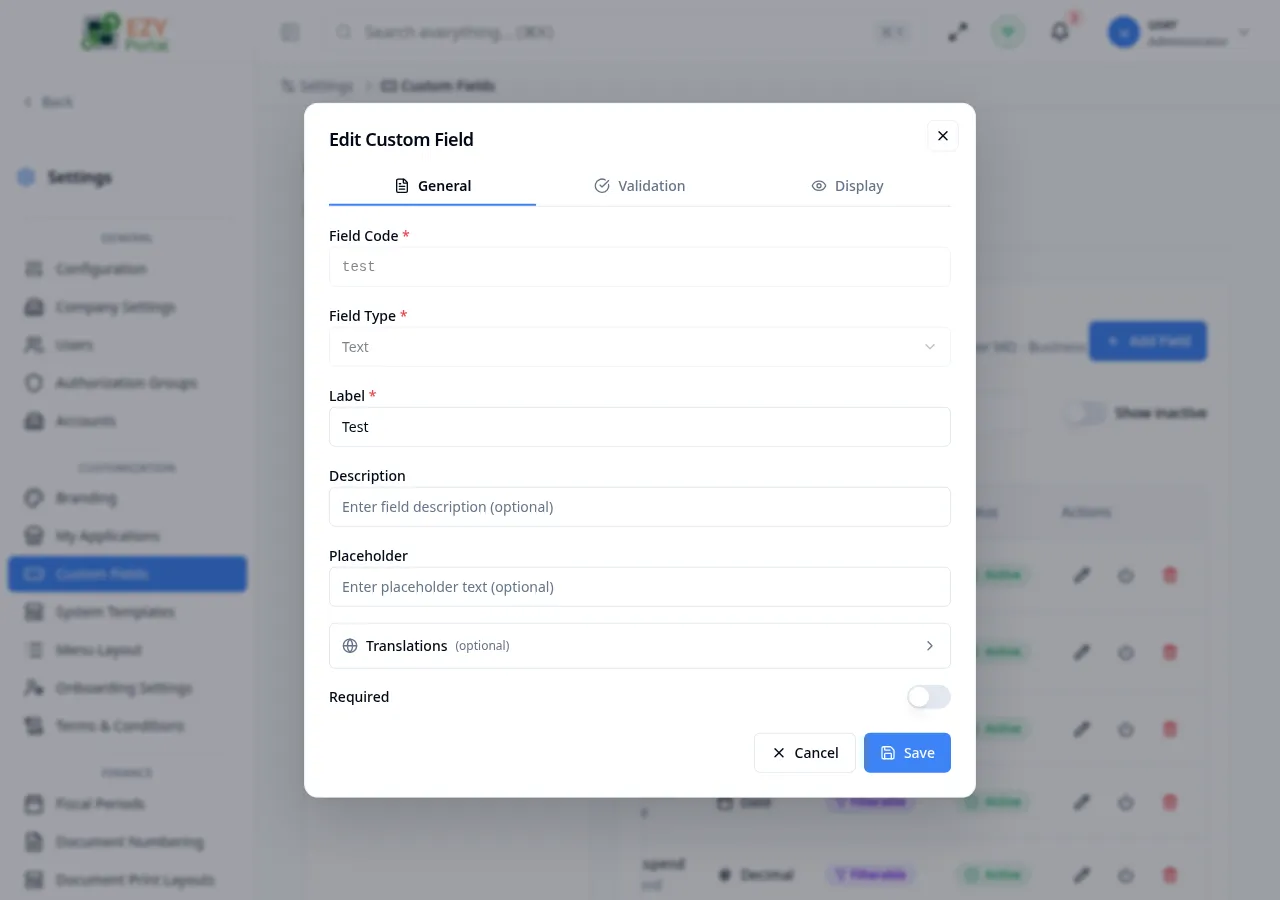
Editing a Custom Field
Section titled “Editing a Custom Field”Open row actions on a field definition and click Edit to open the field definition form pre-filled with existing values.
Same fields as Creating. Field Code and Field Type are read-only after creation and cannot be changed.
Deleting a Custom Field
Section titled “Deleting a Custom Field”Open row actions on a field definition and click Delete. A confirmation dialog asks you to confirm the deletion.
- Open row actions on the target field definition.
- Select Delete.
- Read the warning: deleting the field removes the definition. Confirm by clicking Delete Field.
Note: Deleting a field removes it from all forms immediately. Existing data stored against that field code is preserved in the backend but is no longer accessible through the portal UI.
Related Pages
Section titled “Related Pages”- Terms & Conditions — manage versioned terms text
- System Templates — manage email templates and system page content