WhatsApp Settings
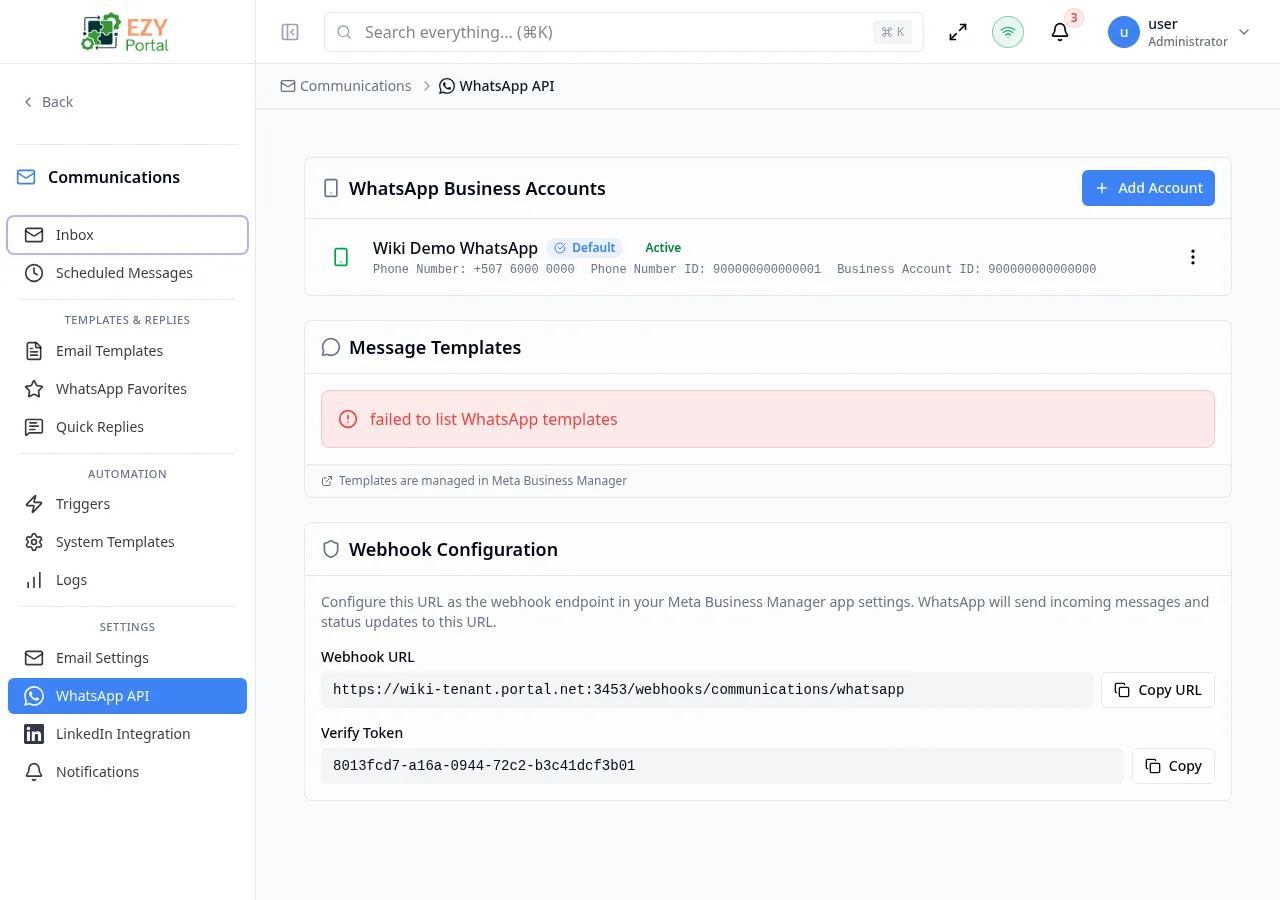
The WhatsApp Settings page manages your tenant’s connection to the WhatsApp Business API through Meta. It has three sections: WhatsApp Business Accounts for API credentials, Message Templates for viewing approved templates synced from Meta, and Webhook Configuration for the incoming-message endpoint.
Accessing the Page
Section titled “Accessing the Page”- Route:
/communications/settings/whatsapp - Menu Path: Communications → Settings → WhatsApp
- Primary audience: Tenant administrators.
What you can do here
Section titled “What you can do here”- Add, edit, and delete WhatsApp Business API accounts.
- View Meta-approved message templates for each connected account.
- Copy the webhook URL and verify token for configuration in Meta Business Manager.
- Mark one account as the default for automation triggers.
Common tasks
Section titled “Common tasks”- Open Communications → Settings → WhatsApp.
- Click Add Account and enter the credentials from your Meta Business Manager app.
- After saving, the Message Templates section automatically loads approved templates for that account.
- Copy the Webhook URL and Verify Token from the Webhook Configuration section.
- Paste the URL and token into your Meta app’s webhook settings.
- Configure an automation trigger to use this WhatsApp account for outbound messaging.
- WhatsApp message templates are created and managed in Meta Business Manager. The portal displays synced template data but cannot create or edit templates in Meta.
- Template status values (
APPROVED,PENDING,REJECTED) reflect the approval state in Meta. OnlyAPPROVEDtemplates can be used in automation triggers. - The Access Token is a long-lived token from your Meta app. Store it securely — it is displayed masked after saving.
- The App Secret is required to validate incoming webhook signatures. Obtain it from your Meta App Dashboard under Settings → Basic.
- The Verify Token is auto-generated when the account is created. Meta uses it to verify your webhook endpoint during setup.
WhatsApp Business Accounts
Section titled “WhatsApp Business Accounts”Creating an Account
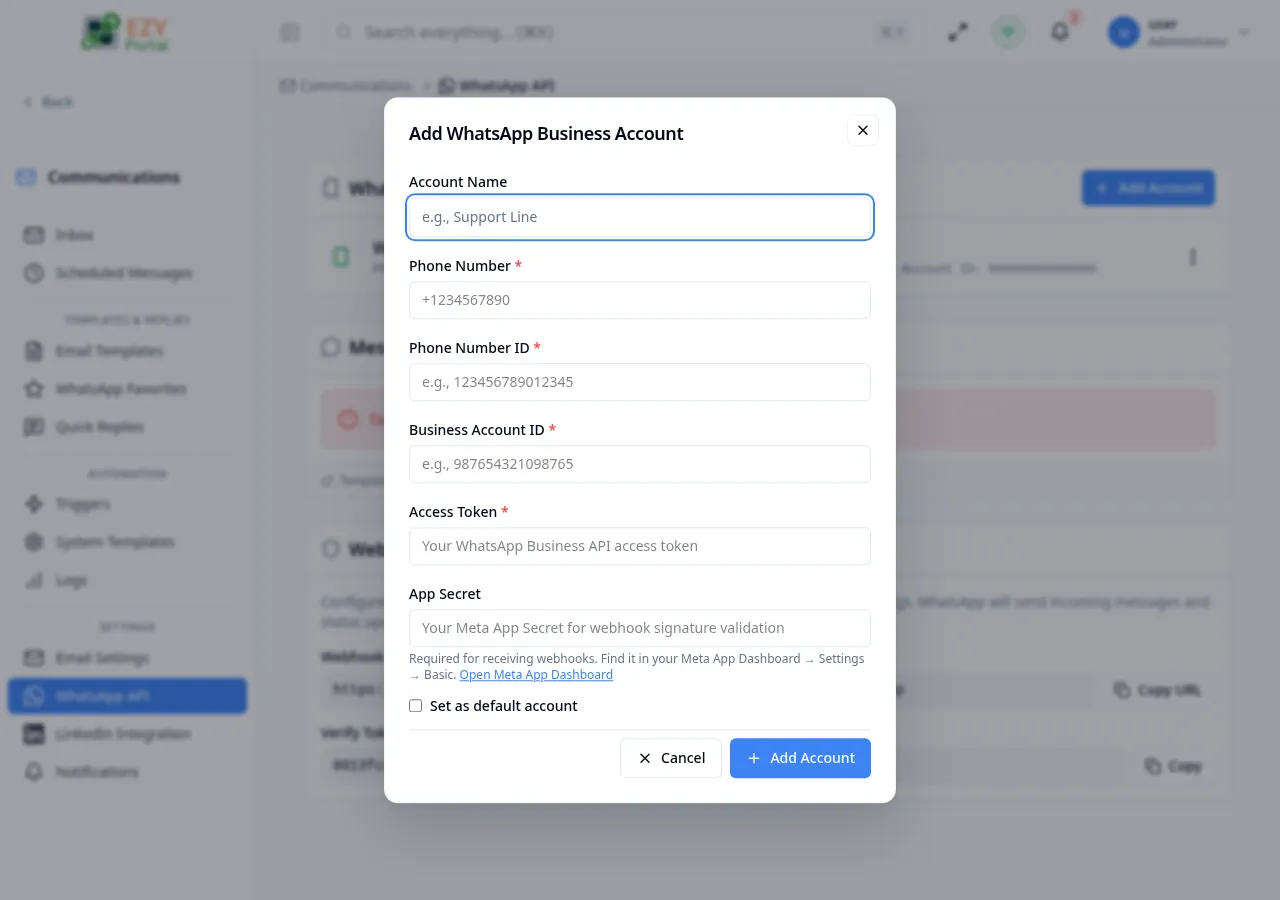
Section titled “Creating an Account”Click Add Account in the WhatsApp Business Accounts section header.
Fields
Section titled “Fields”| Field | Required | Type | Description | Default | Validation |
|---|---|---|---|---|---|
| Account Name | No | Text | Friendly label for this account (for example, “Support Line”) | — | — |
| Phone Number | Yes | Text | WhatsApp-registered phone number in E.164 format (for example, +1234567890) | — | Required |
| Phone Number ID | Yes | Text | Meta Phone Number ID from your WhatsApp Business app | — | Required |
| Business Account ID | Yes | Text | Meta Business Account ID | — | Required |
| Access Token | Yes | Password | WhatsApp Business API access token | — | Required |
| App Secret | No | Password | Meta App Secret for webhook signature validation | — | — |
| Set as default account | No | Toggle | Makes this the default account for WhatsApp automation triggers | Off | — |
Steps:
- In Meta Business Manager, locate your app’s Phone Number ID, Business Account ID, and Access Token.
- Click Add Account in the portal.
- Enter the Phone Number, Phone Number ID, and Business Account ID.
- Paste the Access Token.
- Optionally enter the App Secret (required for incoming webhook signature validation).
- Check Set as default account if this will be used by most automation triggers.
- Click Add Account to save.
Editing an Account
Section titled “Editing an Account”Click the row actions menu on an account and select Edit.
Screenshot pending: Edit WhatsApp Business Account dialog pre-filled with editable fields
In edit mode, only Account Name, Access Token, App Secret, and Set as default account are editable. The Phone Number, Phone Number ID, and Business Account ID are fixed after creation. Leave token fields blank to keep existing values. Click Save to apply.
Deleting an Account
Section titled “Deleting an Account”Click the row actions menu and select Delete.
- A confirmation dialog displays the phone number ID.
- Click Delete to confirm. The account and its webhook association are removed.
Message Templates
Section titled “Message Templates”The Message Templates section displays all templates approved in Meta for the selected account. If you have multiple accounts, use the account selector dropdown to switch between them.
Screenshot pending: Message Templates table showing template name, status badge, language, and category columns
| Column | Description |
|---|---|
| Template Name | The Meta template identifier (for example, order_confirmation) |
| Status | APPROVED, PENDING, or REJECTED |
| Language | Template language code (for example, en_US, es_MX) |
| Category | Meta template category (for example, UTILITY, MARKETING) |
Templates are read-only in the portal. To create, modify, or submit new templates for approval, go to Meta Business Manager.
Webhook Configuration
Section titled “Webhook Configuration”The Webhook Configuration section provides the URL and verify token needed to receive incoming WhatsApp messages.
Screenshot pending: Webhook Configuration section showing the webhook URL and verify token with copy buttons
| Item | Description |
|---|---|
| Webhook URL | The endpoint the portal exposes to receive messages from Meta. Register this URL in your Meta app’s webhook settings. |
| Verify Token | A unique token generated from your default account. Enter this in Meta’s webhook verification step. |
Click Copy URL or Copy to copy the values to your clipboard.
Steps to register the webhook in Meta:
- Copy the Webhook URL from this section.
- In Meta Business Manager → App Dashboard → WhatsApp → Configuration, paste the URL in the webhook URL field.
- Copy the Verify Token and paste it in the verify token field.
- Click Verify and Save in Meta. Meta will send a GET request to the URL to confirm it is reachable.
Related Pages
Section titled “Related Pages”- Automation — configure WhatsApp automation triggers that use these accounts
- Email Settings — configure email servers and accounts