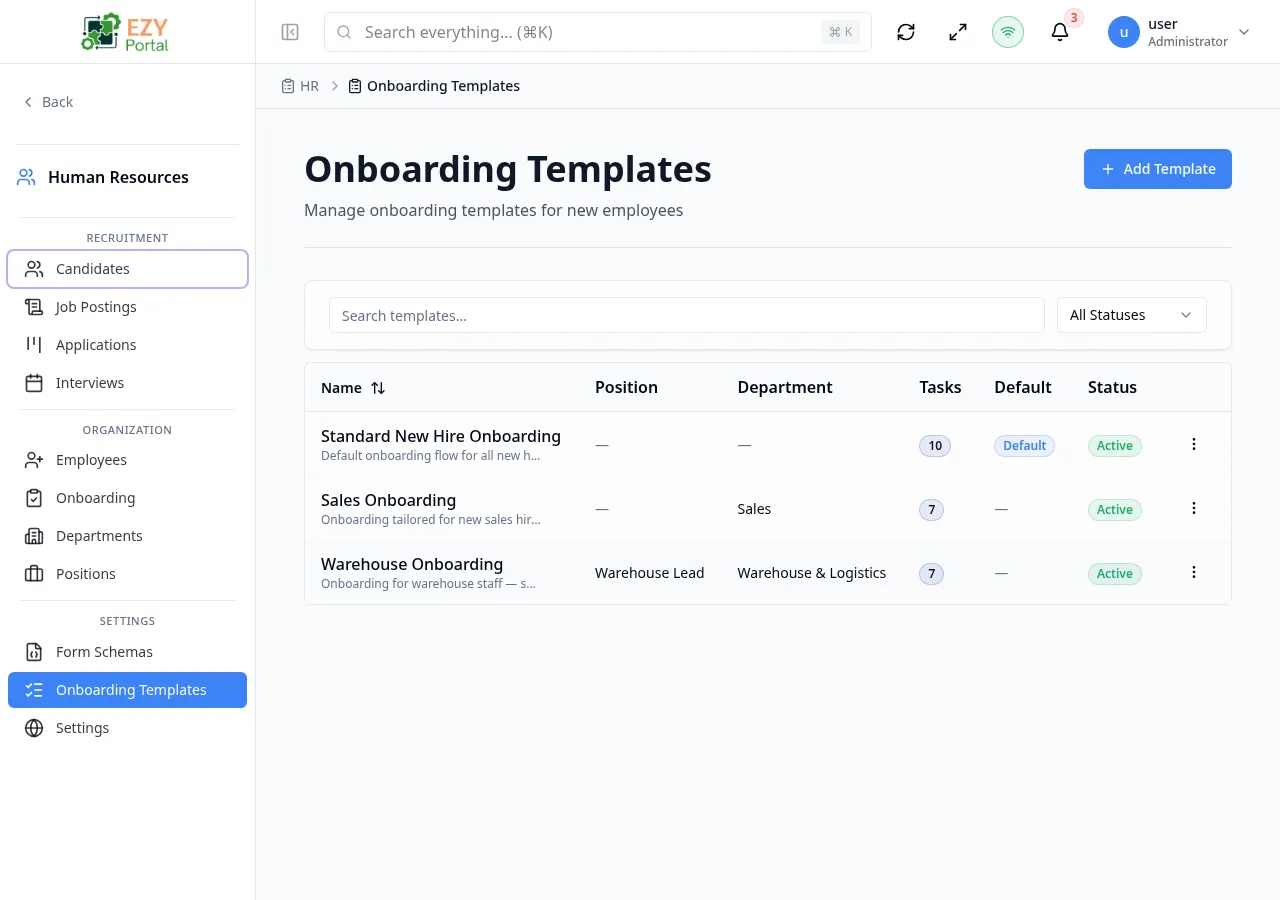
Onboarding Templates
The Onboarding Templates page lets HR administrators define reusable onboarding checklists. Each template contains an ordered list of tasks with due days, required flags, descriptions, and assigned-to labels. Templates can be scoped to a specific position or department, or kept general for all new hires. One template can be set as the default and is automatically applied when a new employee is created with Onboarding status.
Accessing the Page
Section titled “Accessing the Page”- Route:
/onboarding/templates - Menu Path: HR → Onboarding → Templates
List Columns
Section titled “List Columns”| Column | Default Visible | Sortable | Description |
|---|---|---|---|
| Name | Yes | Yes | Template name |
| Position | Yes | No | Linked position scope (if set) |
| Department | Yes | No | Linked department scope (if set) |
| Tasks | Yes | No | Number of tasks in the template |
| Default | Yes | No | Badge shown if this is the default template |
| Status | Yes | No | Active or Inactive badge |
Filtering
Section titled “Filtering”| Filter | Type | Description |
|---|---|---|
| Search | Free text | Searches by template name |
| Status | Select | Active, Inactive, or All |
| Department | Select | Filter by department scope |
Actions
Section titled “Actions”Page Actions
Section titled “Page Actions”| Action | Description |
|---|---|
| Add Template | Opens the Create Onboarding Template dialog |
Row Actions
Section titled “Row Actions”| Action | Description |
|---|---|
| Edit | Opens the Edit Onboarding Template dialog |
| Set as Default | Marks this template as the default for automatic assignment |
| Delete | Opens the Delete confirmation dialog |
Creating a Template
Section titled “Creating a Template”Click Add Template to open the Create Onboarding Template dialog.
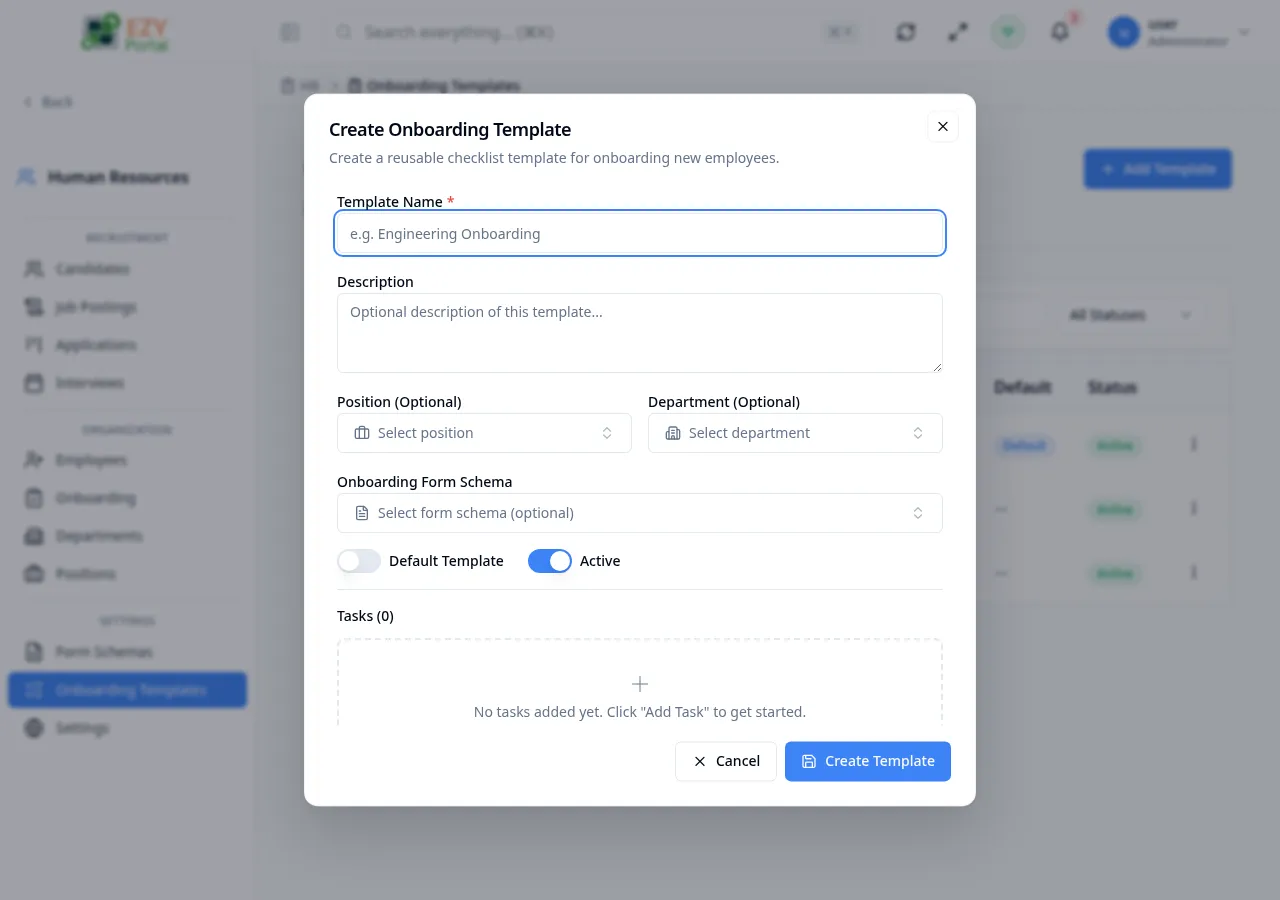
Template Fields
Section titled “Template Fields”| Field | Required | Type | Description | Default | Validation |
|---|---|---|---|---|---|
| Template Name | Yes | Text | Display name of the template | — | Required |
| Description | No | Textarea | Purpose or notes about the template | — | — |
| Position | No | Entity select | Scope template to a specific position | — | — |
| Department | No | Entity select | Scope template to a specific department | — | — |
| Onboarding Form Schema | No | Entity select | Attach a form schema for the employee to fill in during onboarding | — | — |
| Default Template | — | Toggle | Automatically assign this template to new employees | Off | Only one template can be default at a time |
| Active | — | Toggle | Inactive templates are hidden from selection | On | — |
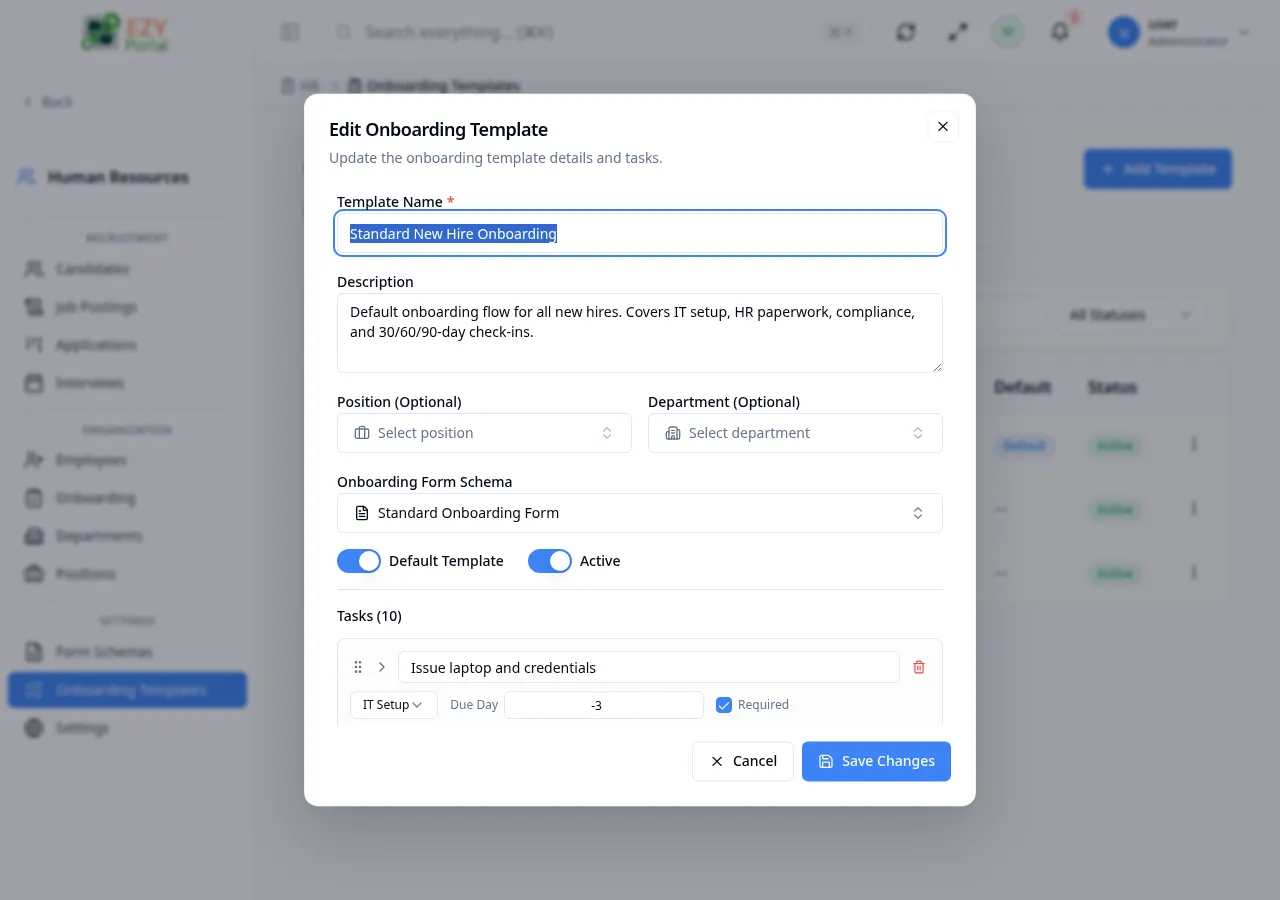
Task Builder
Section titled “Task Builder”Each template contains an ordered list of tasks. Tasks are added using the task builder section at the bottom of the dialog.
| Field | Required | Type | Description |
|---|---|---|---|
| Title | Yes | Text | Task title (e.g., “Sign NDA”, “Set up workstation”) |
| Due Day | No | Number | Day number relative to onboarding start when the task is due |
| Required | No | Toggle | Whether the task must be completed before onboarding can be closed |
| Description | No | Textarea | Detailed instructions for completing the task |
| Assigned To | No | Text | Role or person responsible (free text label, e.g., “IT Team”) |
| Category | No | Select | Documentation, IT Setup, Training, Introductions, Compliance, or Other |
Tasks can be reordered using the Move Up and Move Down controls on each row. Click Add Task to add a new row at the bottom.
Steps to create a template:
- Click Add Template.
- Enter a template name and optionally a description.
- Set position and/or department scope if applicable.
- Add tasks using the task builder: enter a title, set the due day, toggle required, and optionally add a description and assignee.
- Reorder tasks as needed.
- Toggle Default Template on if this should be automatically assigned to new hires.
- Click Create Template.
Editing a Template
Section titled “Editing a Template”Click the Edit row action to open the Edit Onboarding Template dialog. Same fields and task builder as Creating. All fields are editable. Task rows can be added, removed, or reordered.
Setting a Default Template
Section titled “Setting a Default Template”Click the Set as Default row action on any template. If another template is already the default, it is automatically unset. Only one template can be the default at a time.
The default template is automatically assigned to new employees when they are created with Onboarding status and no template is explicitly selected.
Deleting a Template
Section titled “Deleting a Template”- Open row actions and select Delete.
- Confirm in the dialog — the action cannot be undone.
Note: Deleting a template does not affect employee onboarding checklists that were already generated from it. Existing employee checklists remain in place.
Common tasks
Section titled “Common tasks”- Open HR → Onboarding → Templates from the sidebar.
- Click Add Template to create a new template.
- Add tasks with due days and required flags.
- Set the template as default if it applies to most new hires.
Related Pages
Section titled “Related Pages”- Onboarding Dashboard — Monitor onboarding progress
- Onboarding Employee — Per-employee onboarding checklist generated from a template
- Form Schemas — Configure onboarding form schemas